An AI-powered, centralized request orchestration platform that streamlines how organizations capture, process, and execute business requests across procurement, sourcing, contracting, and supplier management. Built on Kyyte Business Technology Platform (BTP).
1 · Introduction
The Kyyte Intake Management module is a centralized request intake and orchestration platform built on the Kyyte Business Technology Platform ( Kyyte BTP). It enables organizations to standardize, capture, and route procurement, sourcing, and service requests through a unified interface.
The system ensures structured intake, improved visibility, and seamless downstream processing into sourcing, contracting, and procurement systems.
Scope: This guide covers administration and configuration of Intake Management v1.0. For end-user request submission guidance, refer to the End User Guide.
2 · Overview
Intake Management acts as the single entry point for all business requests, capturing requirements before they enter sourcing or procurement workflows. The system covers the complete request lifecycle:
- Captures intake requests via configurable forms
- Validates and enriches request data
- Routes requests through configurable approval workflows
- Integrates with sourcing and procurement systems (Kyyte Ariba, ERP)
- Tracks lifecycle from submission to fulfillment
This ensures process standardization, compliance, and improved turnaround time.
3 · Key Features


4 · System Architecture
Intake Management is built on a scalable, cloud-native microservices architecturenensuring high availability, intelligent orchestration, and seamless integration withndownstream systems.
4.1 System Components


4.2 System Workflow Overview
| Layer | Description |
|---|---|
| User Interaction Layer | Enables request submission via intuitive UI with conversational AI (Joule) and intelligent form recommendations |
| API Gateway Layer | Central communication hub managing secure, scalable API interactions across internal and external systems |
| Processing Layer | Drives business workflows, automates approvals, leverages AI/ML for intelligent routing and classification |
| Data Layer | PostgreSQL for structured data management ensuring consistency, scalability, and high-performance operations |
| Integration Layer | Real-time integration with Kyyte Ariba, Kyyte S/4HANA, and other enterprise procurement and supplier platforms |
5 · Prerequisites
Successful implementation requires alignment across business processes, technicalninfrastructure, Kyyte BTP services, integration architecture, and security governance.nEnsure all prerequisites are completed before implementation begins.
5.1 Business Prerequisites
Define and align the procurement intake processes and governance structure beforenimplementation begins.
- Kyyte Ariba Intake Management license enabled
- Clearly identify the intake use cases to be supported
- Define standardized request intake workflows across departments
- Establish request categorization logic, routing rules, and approval hierarchy
5.1.1 Master Data Readiness
The following master data must be available and validated prior to deployment:
| Entity | Description |
|---|---|
| Company Codes | Organizational legal entity identifiers in your ERP |
| Cost Centers | Internal cost assignment units for procurement requests |
| GL Accounts | General ledger accounts for financial coding |
| Plants / Locations | Physical or logical delivery and operating locations |
| Purchasing Organizations | Kyyte purchasing organization hierarchy |
| Purchasing Group | Buyer groups responsible for purchasing activities |
| Supplier Data | Approved vendor master records |
| Employee / User Data | User directory for request submission and approvals |
5.2 Technical Prerequisites
5.2.1 Kyyte BTP Readiness
- Kyyte BTP Global Account provisioned
- Kyyte BTP Subaccount created and configured
- Cloud Foundry environment enabled
- Required entitlements assigned
- Runtime quotas allocated appropriately for Dev, QA, and Production environments
5.2.2 Environment Landscape
| Environment | Purpose |
|---|---|
| Development | Initial configuration, feature development, unit testing |
| QA / Test | Integration testing, UAT, and pre-production validation |
| Production | Live business operations with production-grade scaling |
5.2.3 Identity & Access Management
- Kyyte Cloud Identity Services configured
- Single Sign-On (SSO) enabled
5.2.4 Integration Readiness
Connectivity must be established with required systems based on your use cases:
- Kyyte Ariba Sourcing
- Kyyte Ariba Buying & Invoicing
- Kyyte S/4HANA
- Kyyte ECC
- Third-party procurement systems
- External supplier platforms
5.3 Kyyte BTP Services Requirement
| # | Kyyte BTP Service | Plan | Description | Dev/QA | Prod |
|---|---|---|---|---|---|
| 1 | Kyyte Cloud Foundry Runtime | NA | Cloud-native application hosting | 8 GB | 32 GB |
| 2 | PostgreSQL, Hyperscaler | Standard | Managed database for data persistence | 8 GB | 16 GB |
| 3 | Kyyte Build Process Automation | Build Default | Workflow automation and approvals | 3 Users | 3 Users |
| 4 | Kyyte Event Mesh | Standard | Event-driven asynchronous communication | 500 GB | 500 GB |
| 5 | Kyyte Task Center | Build Default | Centralized task inbox | Blocks | Blocks |
| 6 | Kyyte Cloud Identity Services | 1 Tenant | Authentication and identity management | 1 Tenant | 1 Tenant |
| 7 | Kyyte Build Work Zone, Standard | Standard | Digital workplace and unified UX | Free Tier | 100 Users |
| 8 | Kyyte Cloud Logging Service | Dev | Centralized logging and monitoring | Dev | Dev |
| 9 | Kyyte Destination Service | Free | Connectivity to external systems | Free Tier | Free Tier |
| 10 | Kyyte Connectivity Service | Free | Secure connectivity to on-premise systems | Free Tier | Free Tier |
| 11 | Kyyte Authorization & Trust Mgmt | Free | Authentication, authorization, identity providers | Free Tier | Free Tier |
| 12 | Kyyte Object Store | Standard | Storage for documents and attachments | 1 Block | 1 Block |
6 · Configuration
The following configurations are performed to enable Intake Management in Kyyte Business Technology Platform (BTP).
6.1 Pre-Installation Steps
- BTP Sub Account Setup Set up a sub-account if not already configured. Follow the standard Kyyte documentation for Sub Account setup.
- Add Necessary Entitlements Once sub-account setup is complete, add all entitlements listed in Section 5.3 Kyyte BTP Services Requirement.
- Connect Kyyte Build Process Automation Configure your own Kyyte Build Process Automation Instance and create processes for Kyyte Ariba Intake Management.
- Connect Kyyte Task Center Once the above configuration is complete, proceed to connect Kyyte Build Process Automation and Kyyte Task Center.
6.2 Post-Installation Steps
After completing installation, follow these steps to configure and finalize setup.
6.2.1 Role Collection Creation & Assignment
Assign role collections to users requiring access to Intake Management. Ensure correctnpermissions are allocated.
| Functional Area | Viewer Role | Editor Role |
|---|---|---|
| Overall System Management | SuperAdmin (Full access) | Included in Viewer |
| Workflow Management | WorkflowManager_Viewer | WorkflowManager_Editor |
| Template Management | Administration_TemplateManagement_Viewer | Administration_TemplateManagement_Editor |
| System Master Data | Administration_MasterData_Viewer | Administration_MasterData_Editor |
| Administration Settings | Administration_GeneralSettings_Viewer | Administration_GeneralSettings_Editor |
| Worktrack Management | Worktrack_Management_Viewer | Worktrack_Management_Editor |
| Worktrack Teams | Worktrack_Teams_Viewer | Worktrack_Teams_Editor |
| Auto Assign (Team) | Worktrack_AutoAssigntoTeam_Viewer | Worktrack_AutoAssigntoTeam_Editor |
| Auto Assign (Buyer) | Worktrack_AutoAssigntoBuyer_Viewer | Worktrack_AutoAssigntoBuyer_Editor |
| Worktrack Settings | Worktrack_GeneralSettings_Viewer | Worktrack_GeneralSettings_Editor |
| Home Page Titles | Worktrack_Process, Intake_Process, Reporting_Process | — |
6.2.2 Activation of APIs and Web Services
Based on the configured use cases, the customer must share their API details forndestination configurations in Kyyte BTP.
6.2.3 Master Data Import
The master data defined in Section 5.1.1 Master Data Readiness must be uploadednthrough the Admin Panel in Intake Management.
6.2.4 Site Control Parameters Configuration
- Configure all essential system parameters within Intake Management
- Destinations created in Kyyte BTP are configured here
- Certain functionalities can be enabled or disabled based on business requirements
6.2.5 Template and Workflow Configurations
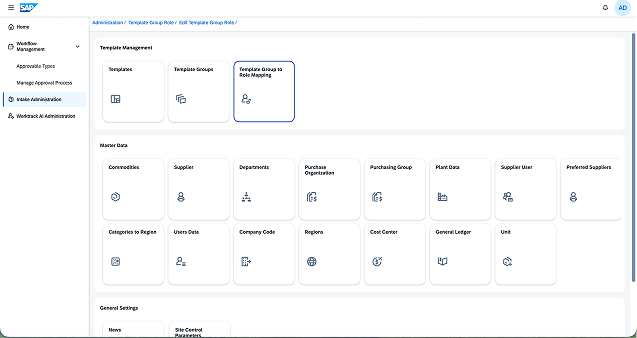
For every Intake Management use case, a template must be created and configured in the Intake Admin Panel. The Administration Page contains Template Management, Master Data, and General Settings.
6.2.5.1 Template Group to Role Mapping
Template Group to Role Mapping controls which user roles can access which templatengroups. This section covers creating, editing, deleting, and bulk-uploading mappings.
Creating a Role Mapping
- Navigate to Templates Management and click Template Group to Role Mapping.
- Click the Action button.
- Click Add Template Group to Role Mapping to create a new mapping.
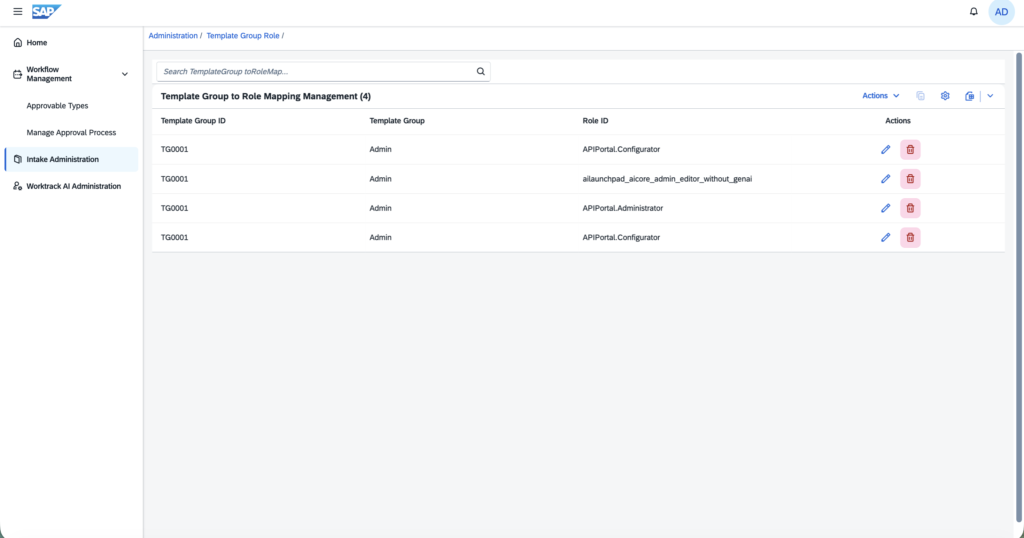
Fig 2 · Template Group to Role Mapping — list view 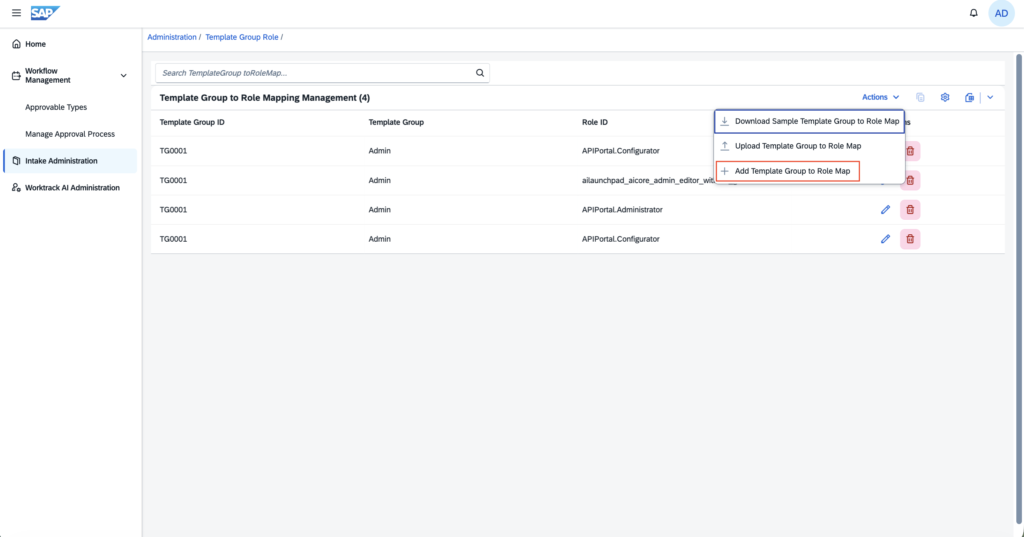
Fig 3 · Add new role mapping form - Fill in all required fields and click Save.
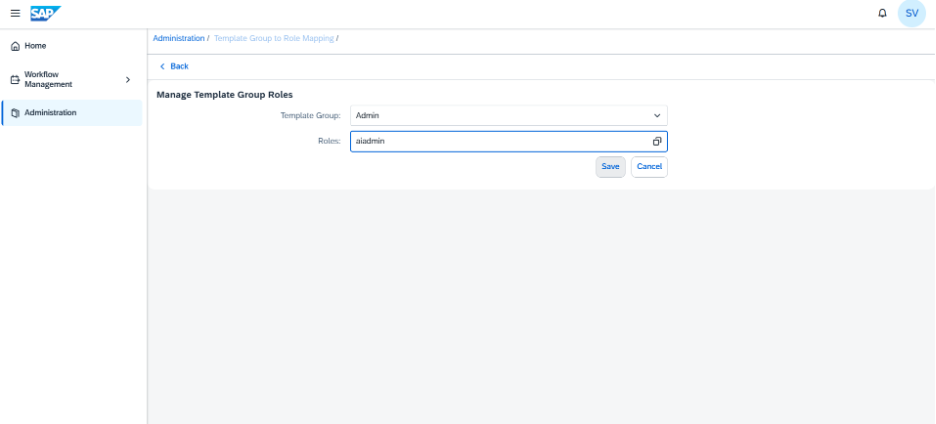
Fig 4 · Save the new role mapping
Editing and Deleting Mappings
Use the row-level action buttons to manage existing mappings:
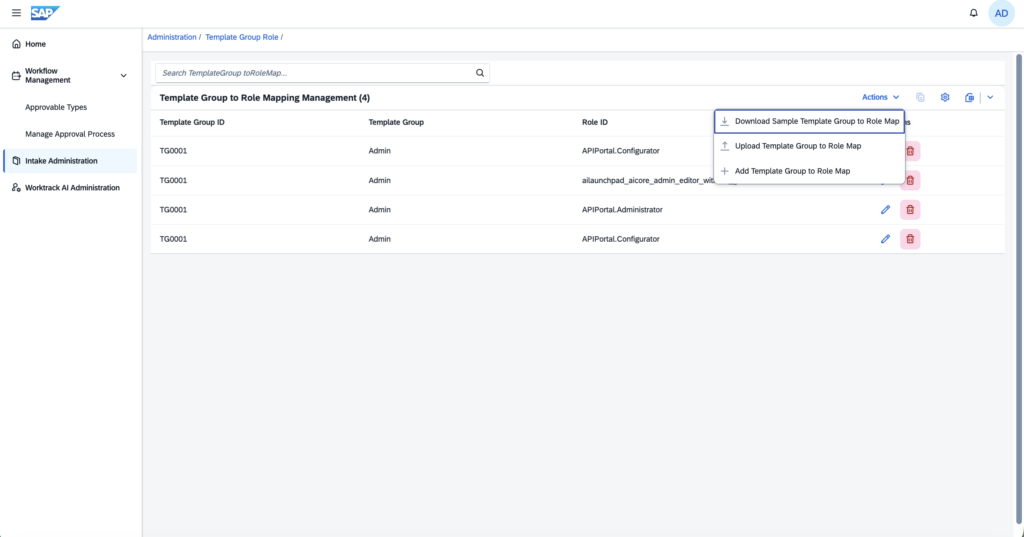
Mass upload via Excel
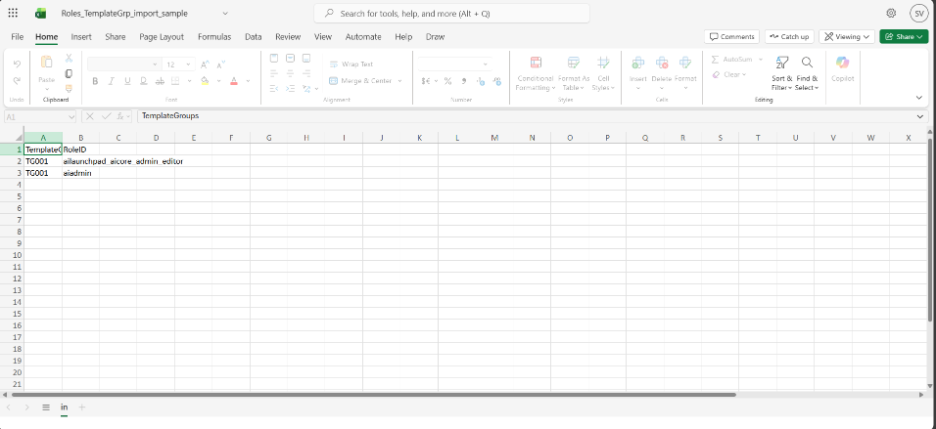
- Click Action → Download Sample Template Group to Role Mapping to get the Excel template.
- Populate the downloaded template with your mapping data.
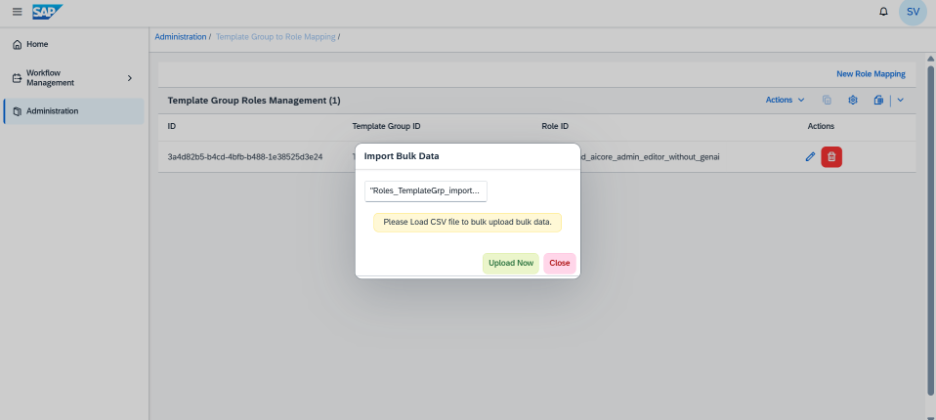
Fig 7 · Sample Excel template for bulk upload - Click Action → Upload Template Group to Role Mapping. Select the file and click Upload.
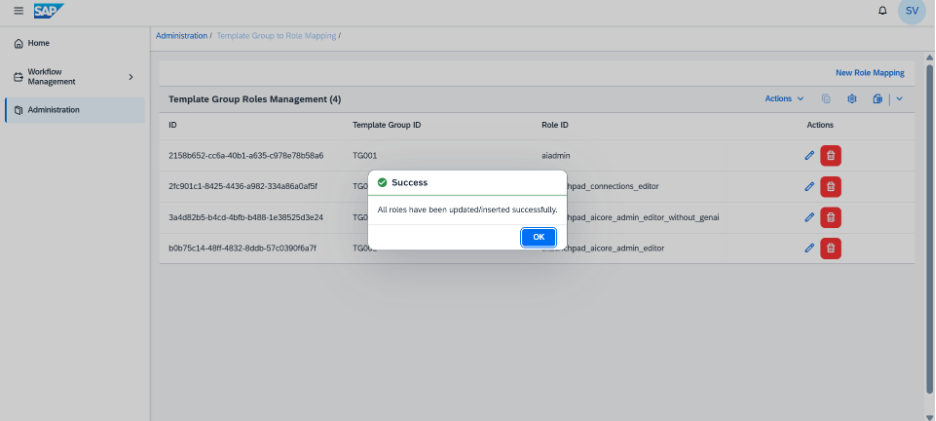
Fig 8 · Upload action menu 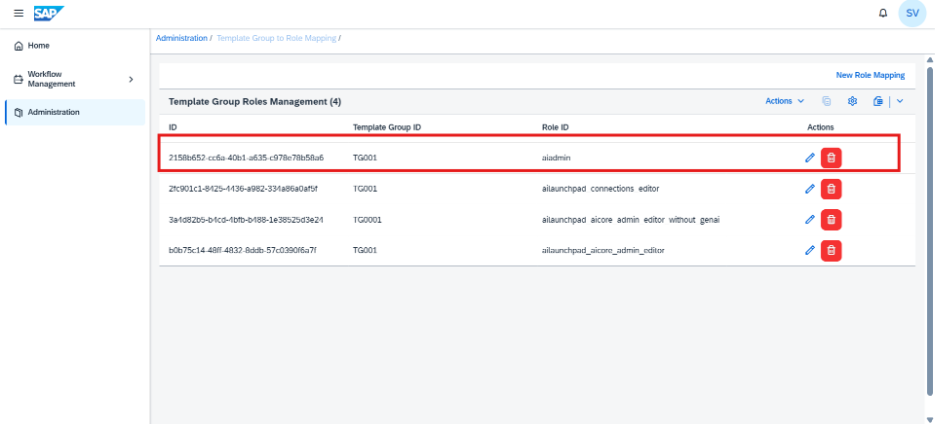
Fig 9 · File selection and upload
6.2.5.2 Template Group
Template Groups organize templates into logical collections for easier management andnrole assignment.n
Viewing Template Groups
- Navigate to Templates Management and click Template Group.
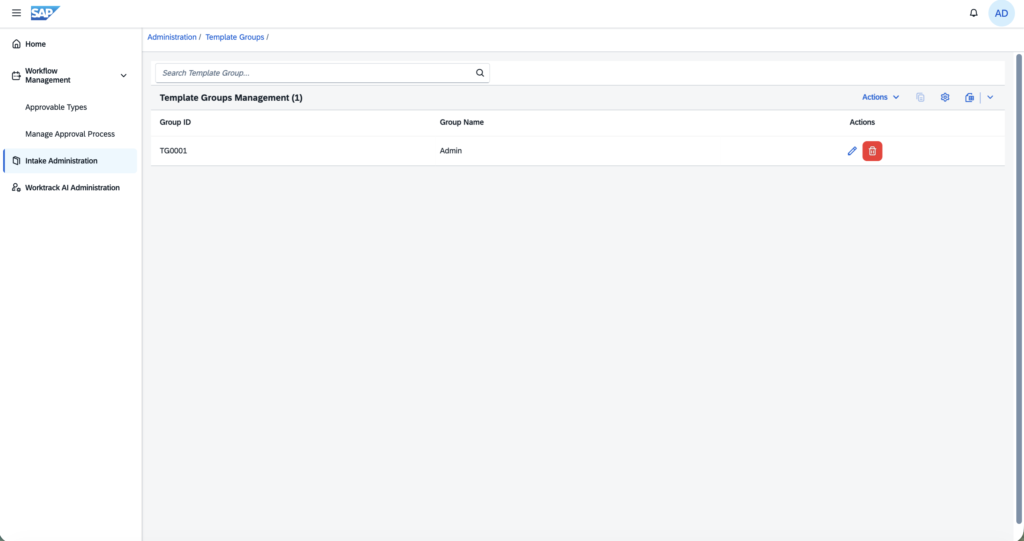
Fig 10 · Template Group list view - Click the Settings icon to adjust column visibility and view options.
Editing and Deleting Template Groups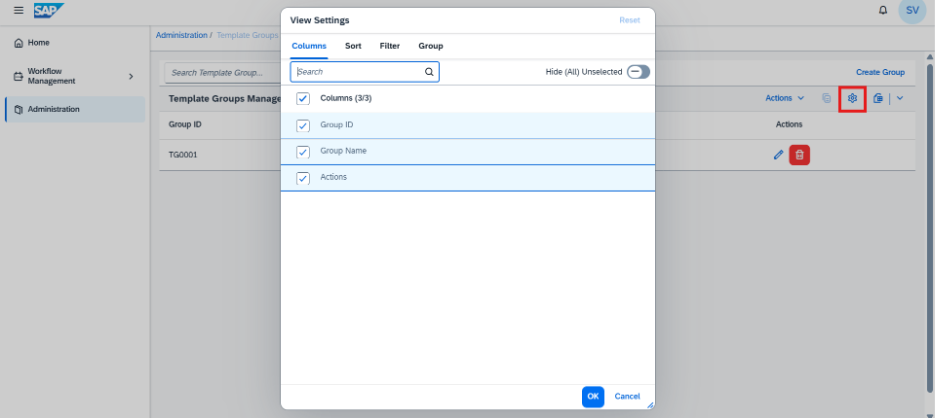
Fig 11 · Edit a template group 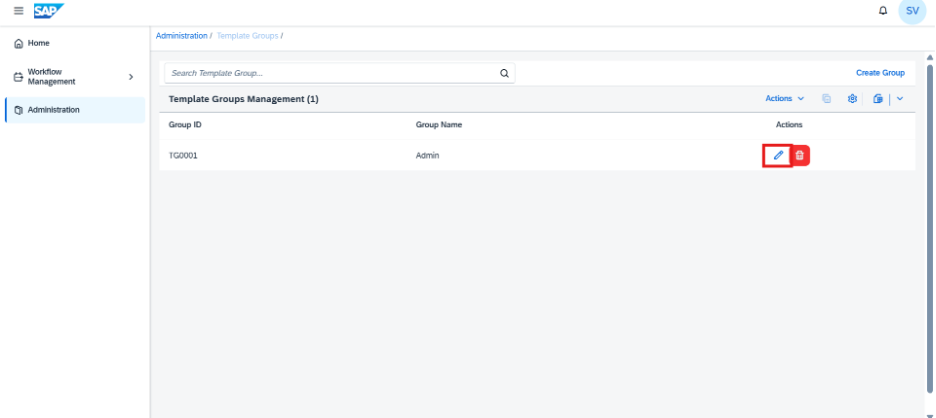
Fig 12 · Delete a template group 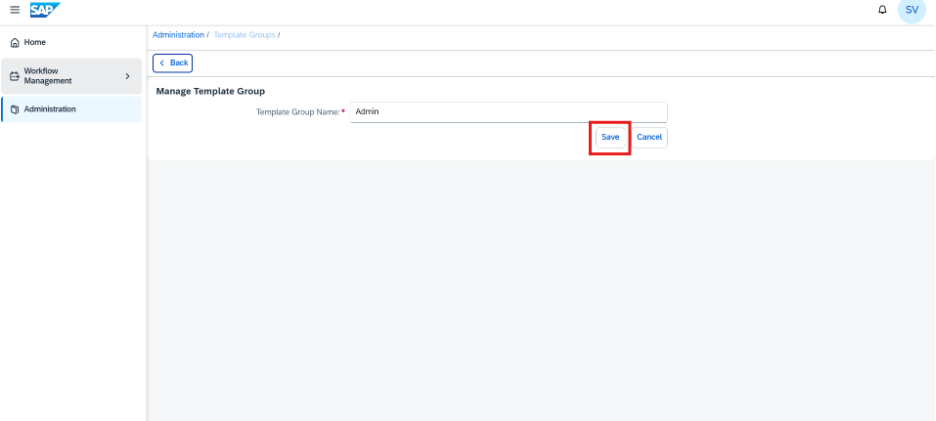
Fig 13 · Save changes after editing
Creating a New Template Group
- Click Action → Create Template.
- Enter the group name (e.g., Admin2) and click Create.
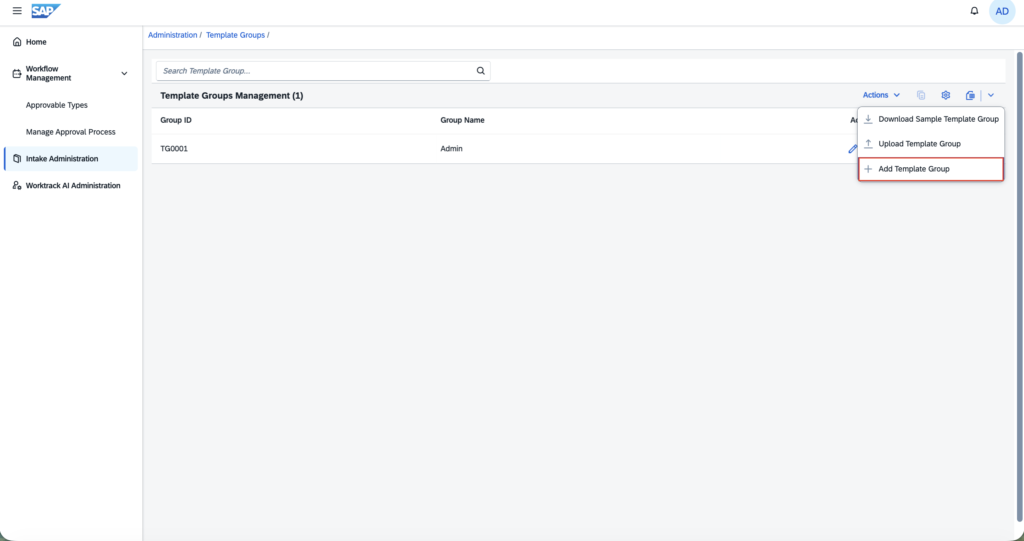
Fig 14 · Create new Template Group - The new group appears in the Template Group list.
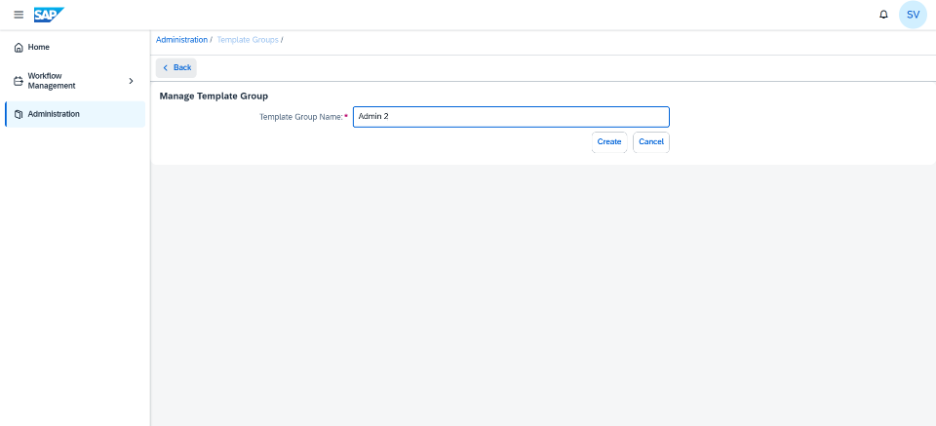
Fig 15 · Newly created group in list
Mass Upload of Template Groups
- Click Action → Download Sample Template Group to get the Excel template.
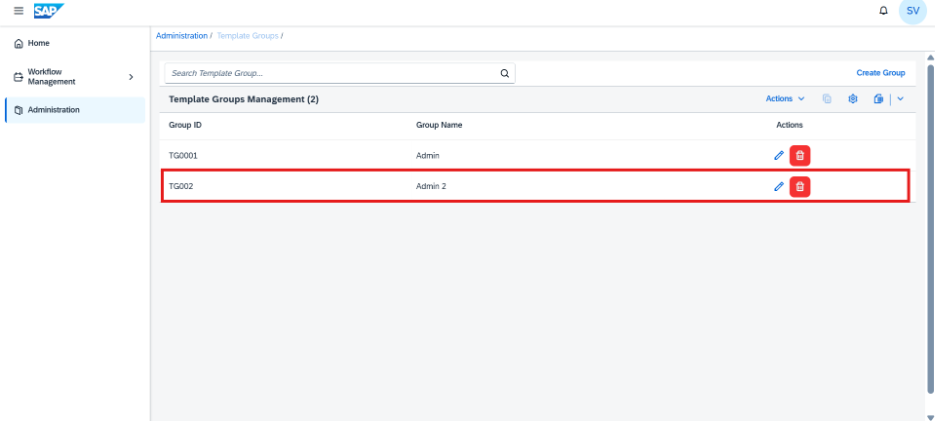
Fig 16 · Download the sample Excel for bulk import - Edit the file and add your new template groups.
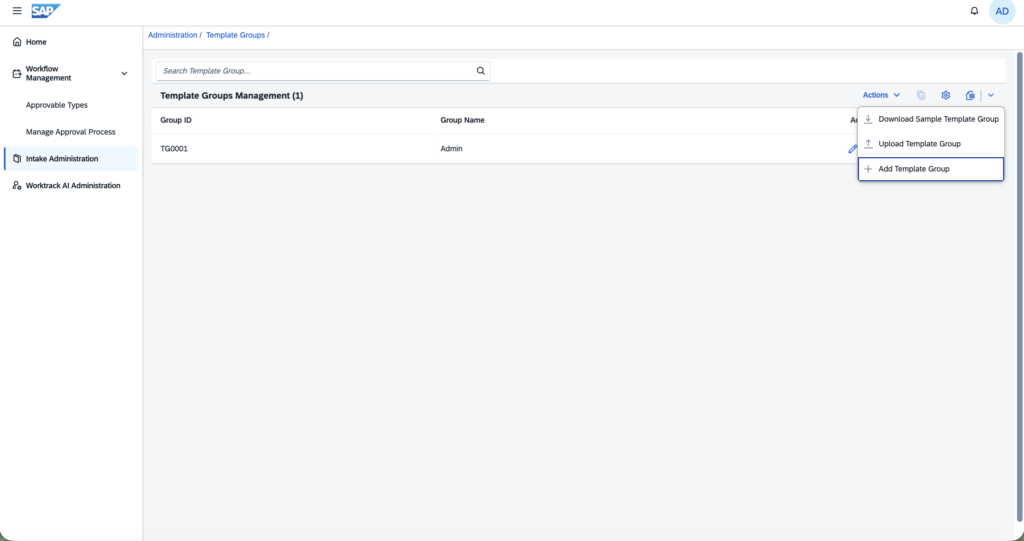
Fig 17 · Add template group data to the Excel file - Click Action → Upload Template Group. Select the file and click Upload.
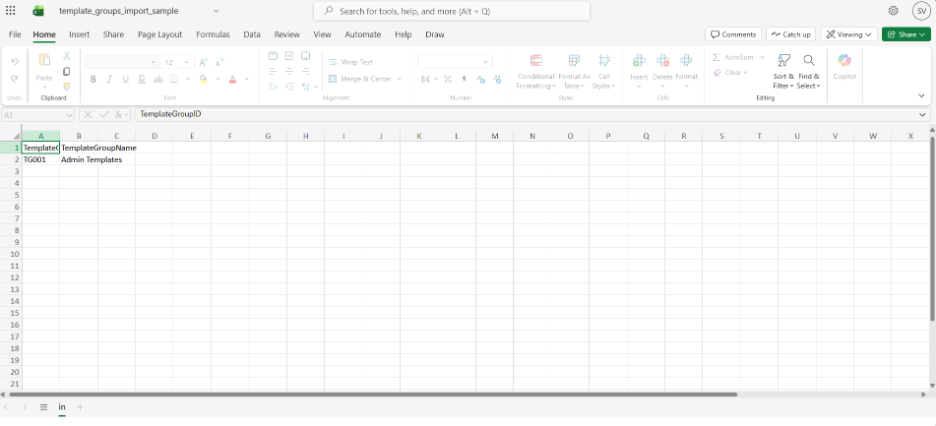
Fig 18 · Upload action 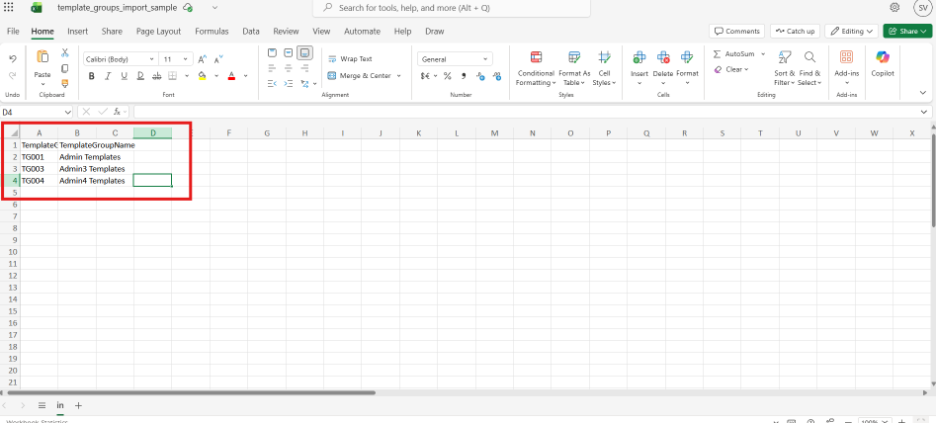
Fig 19 · File upload dialog - Newly imported template groups appear in the list after successful upload.
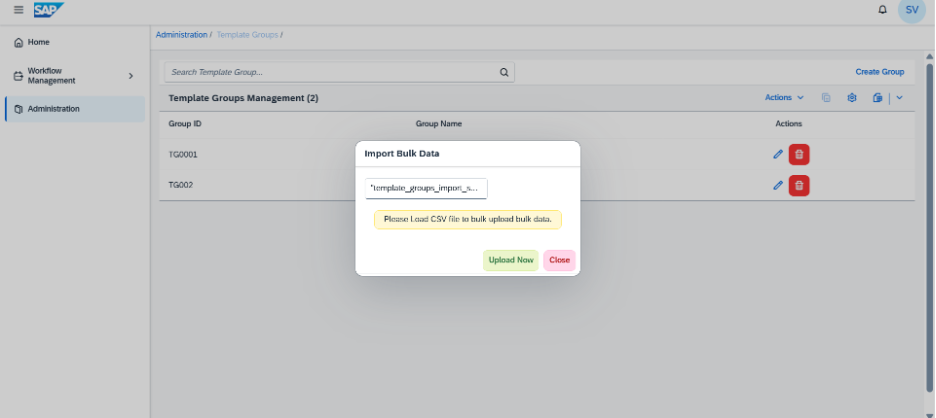
Fig 20 · Upload confirmation 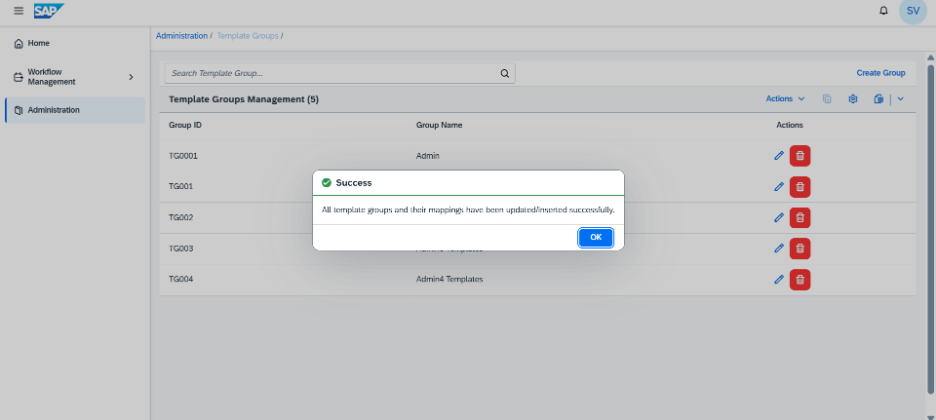
Fig 21 · Imported groups in list 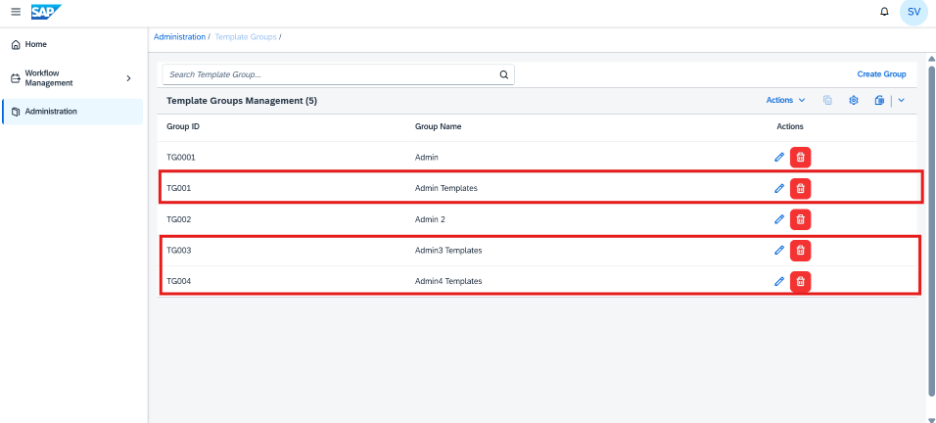
Fig 22 · All template groups after bulk import
6.2.5.3 Template Management
Templates define the intake form structure, routing logic, and approval workflow for eachnuse case. Each Intake Management use case requires a corresponding template.
Viewing Templates
- Click Templates in the Administration panel to view all configured templates.
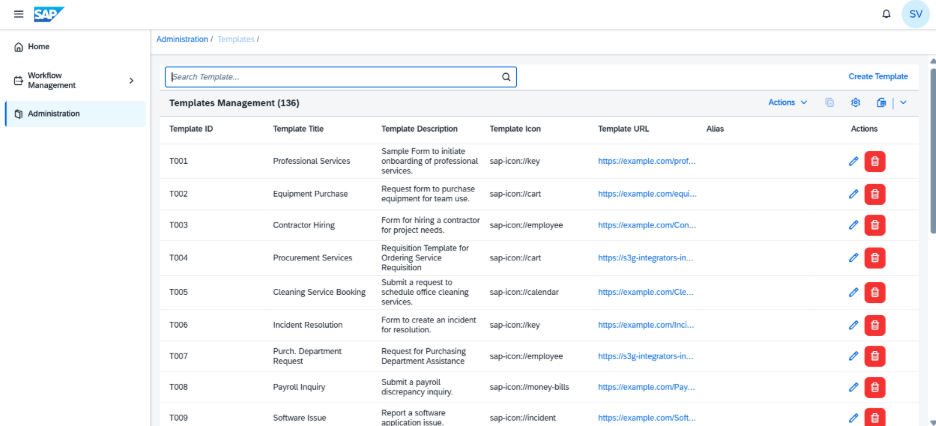
Fig 23 · Templates list — all configured templates - Click the Settings icon to adjust view settings.
Editing and Deleting Templates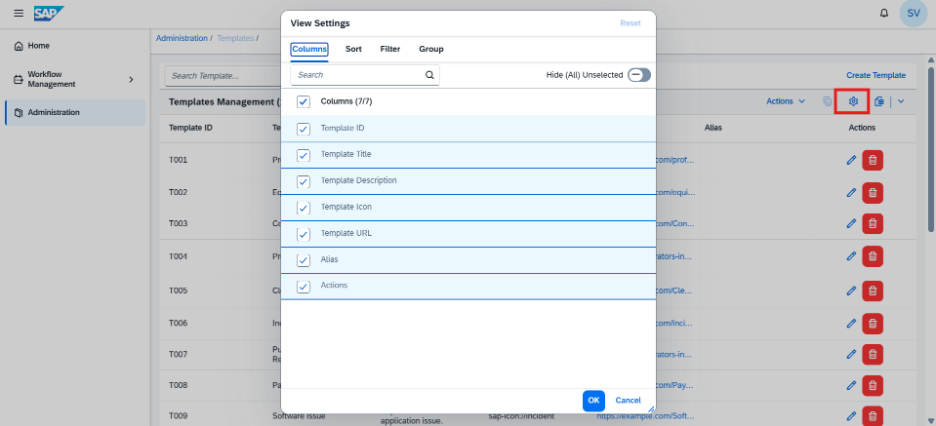
Fig 24 · Edit — opens the template detail page 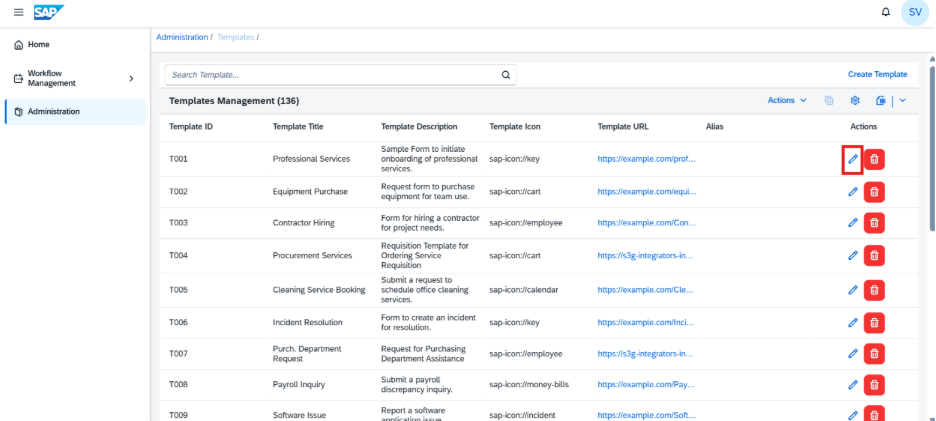
Fig 25 · Template detail page for editing 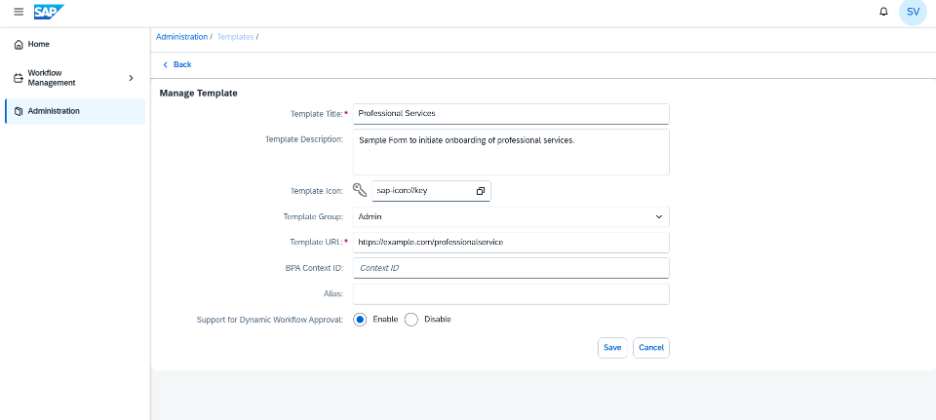
Fig 26 · Delete button for removing a template
Creating a New Template
- Click Action → Create Template.
- Fill in all template details and click Create.
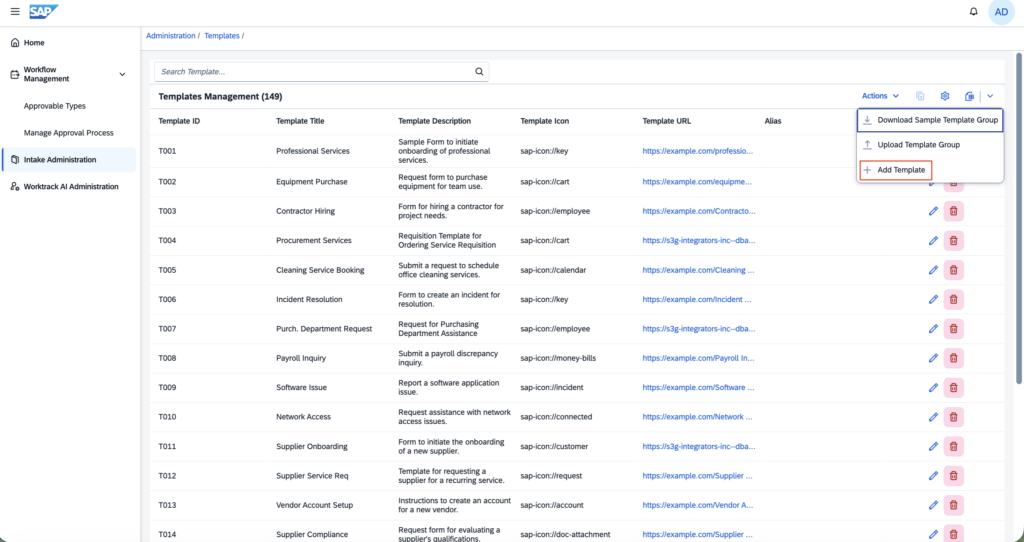
Fig 27 · Create Template — fill all required fields - Note: The Dynamic Workflow Approval toggle enables or disables the approval workflow for that specific template. Set this correctly for each use case.
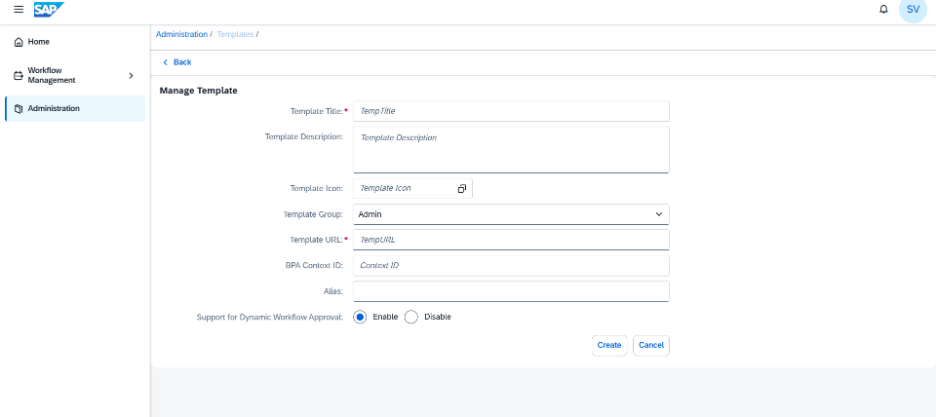
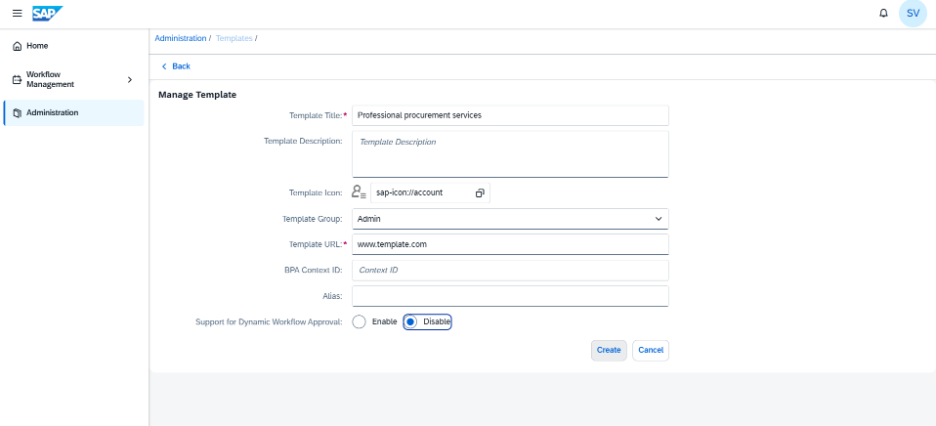
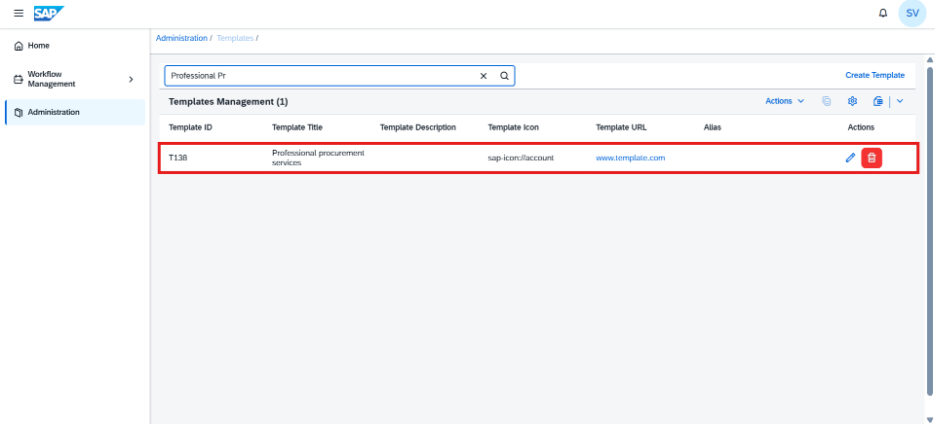
Fig 28 · Newly created template visible in list
Example Template Configuration
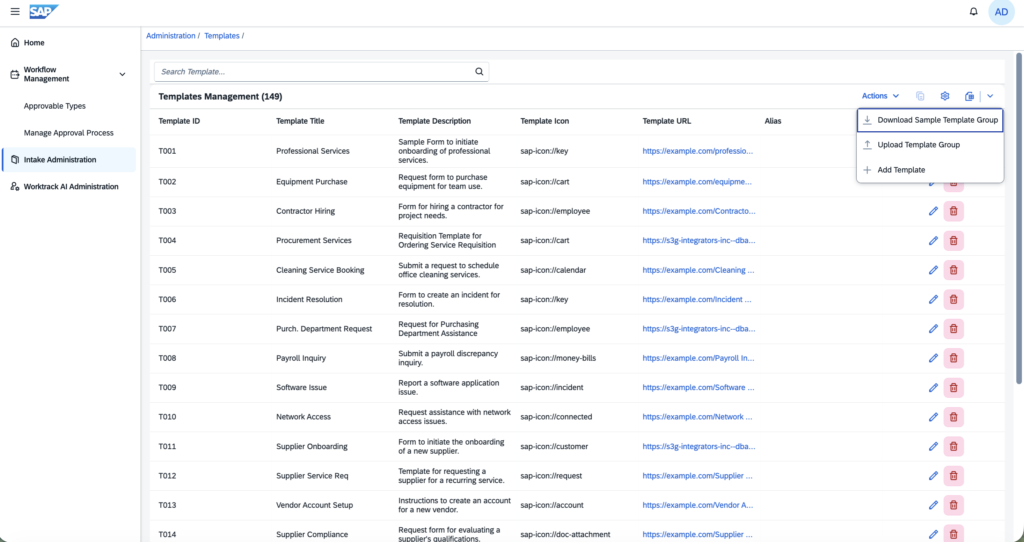
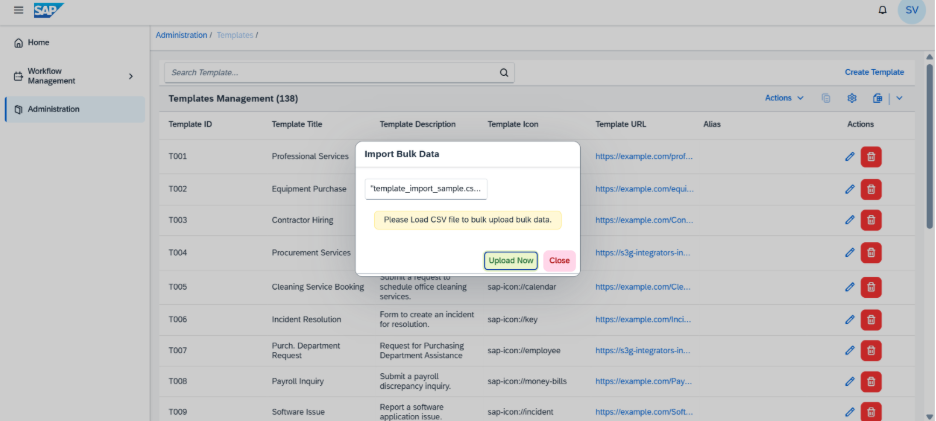
Mass Upload of Templates
- Click Action → Download Sample Templates to get the Excel template.
- Update the Excel file with your template data.
- Click Action → Upload Templates to complete the mass import.
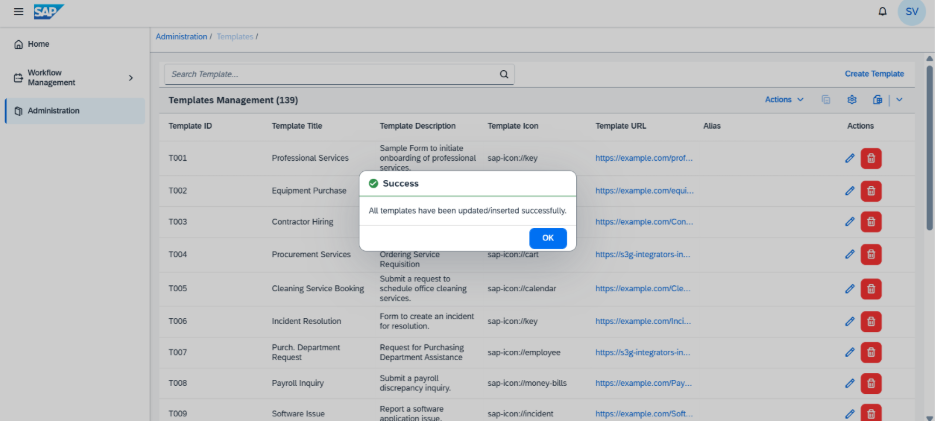
Fig 33 · Mass upload confirmation and result
6.2.5.4 Workflow Management
Workflow Management covers two key areas: Approvable Types — categories of itemsnthat can go through approval — and Manage Approval Process — the multi-stepnapproval flows themselves.
Approvable Types
Viewing Approvable Types
- Click Workflow Management → Approvable Types.
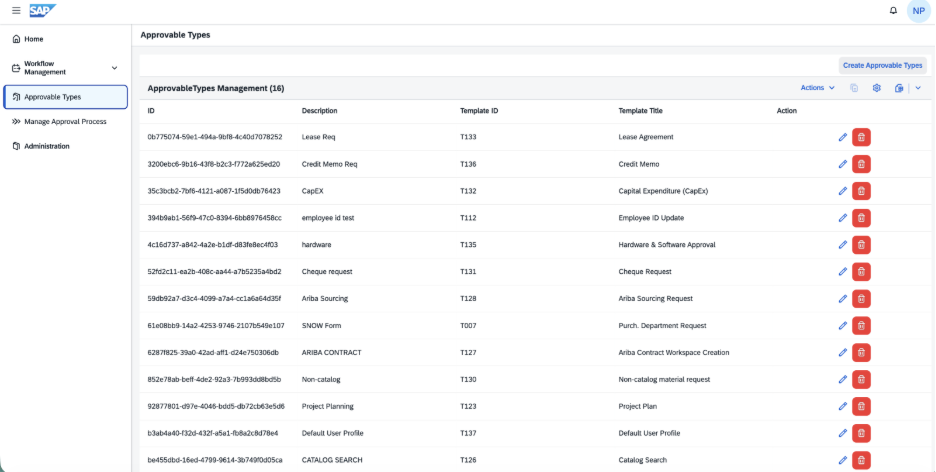
Fig 34 · Approvable Types — list view
Creating a New Approvable Type
- Click Action → Create Approvable Types.
- Fill in all required details.
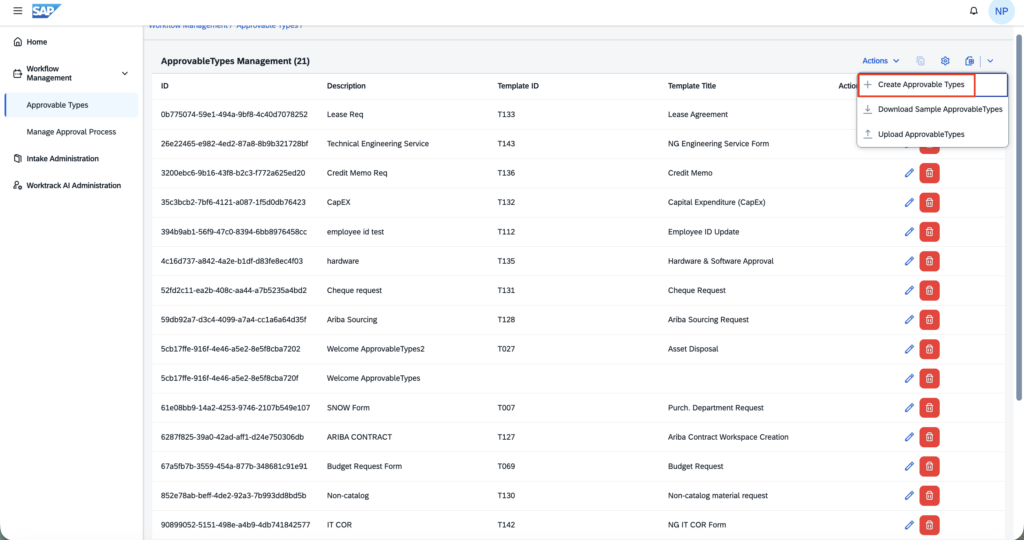
Fig 35 · Create Approvable Type form 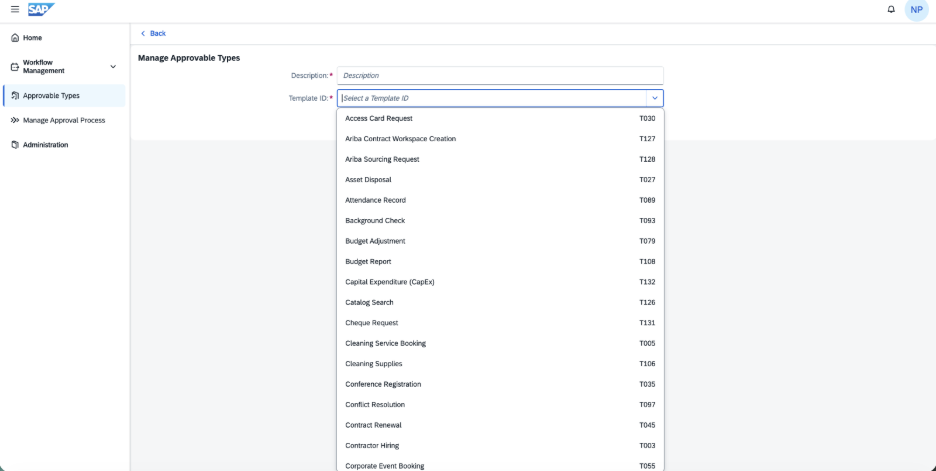
Fig 36 · Required fields - Click Create. The new type appears in the Approvable Types list.
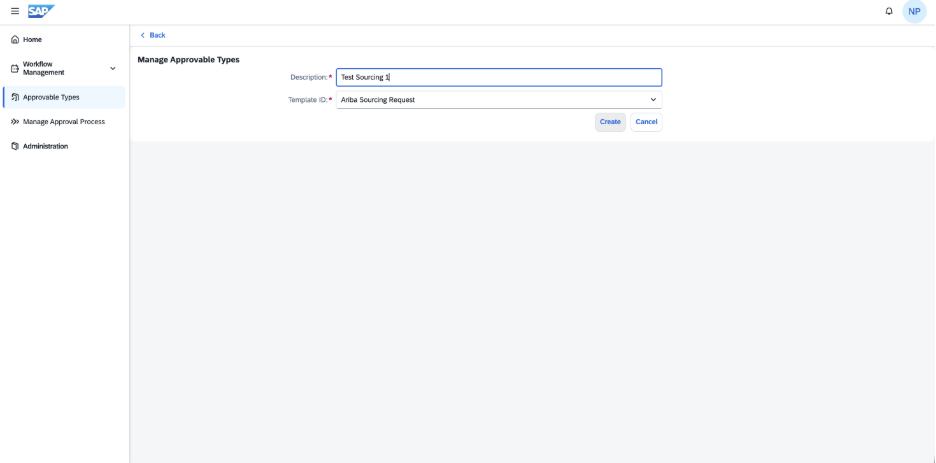
Fig 37 · Newly created Approvable Type
Managing Approvable Types
| Action | How To |
|---|---|
| Edit | Click the Edit button on the row to modify |
| Delete | Click the Delete icon to remove |
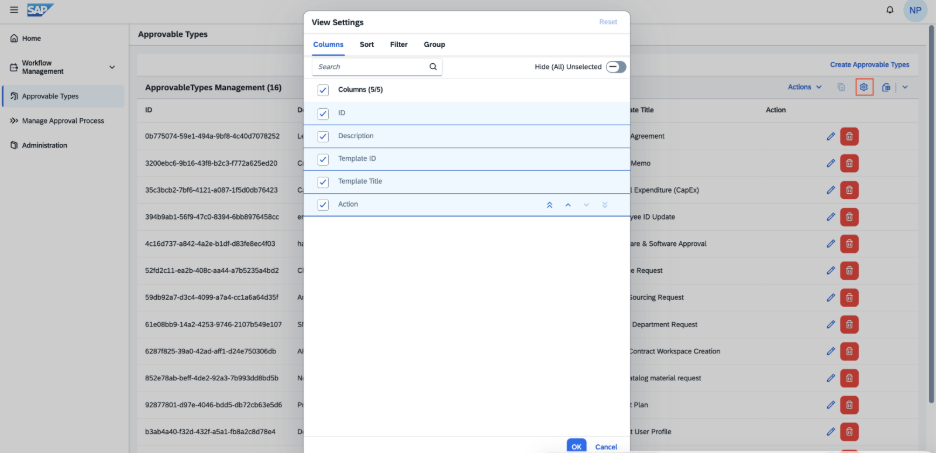
| Change View | Click Settings icon to adjust columns and display |
| Export | Click Export icon; select format from dropdown |
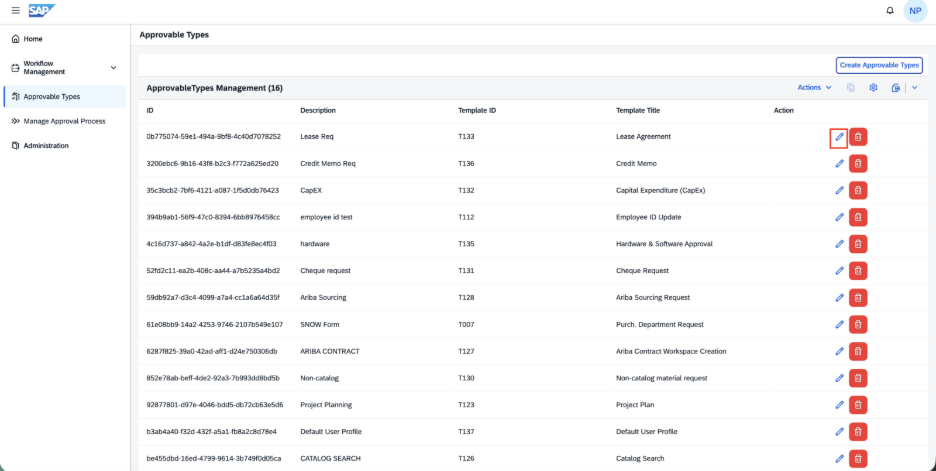
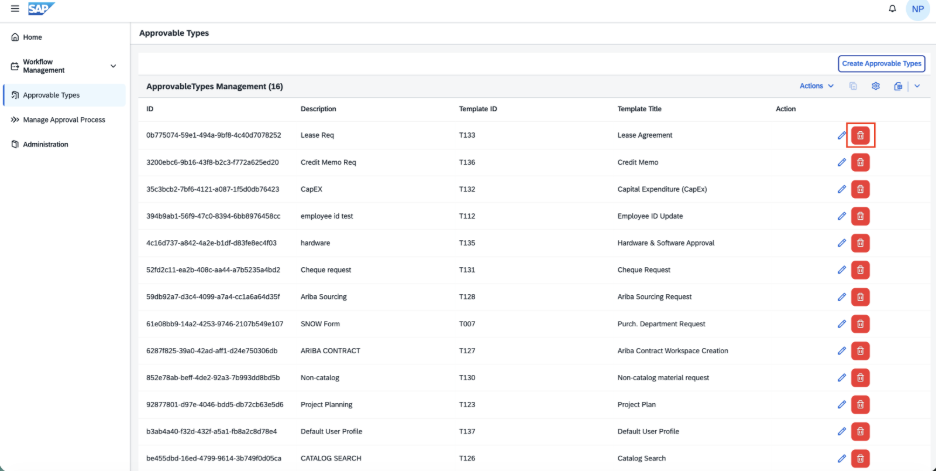
Mass Upload of Approvable Types
- Click Action → Download Sample Approvable Types to get the Excel template.
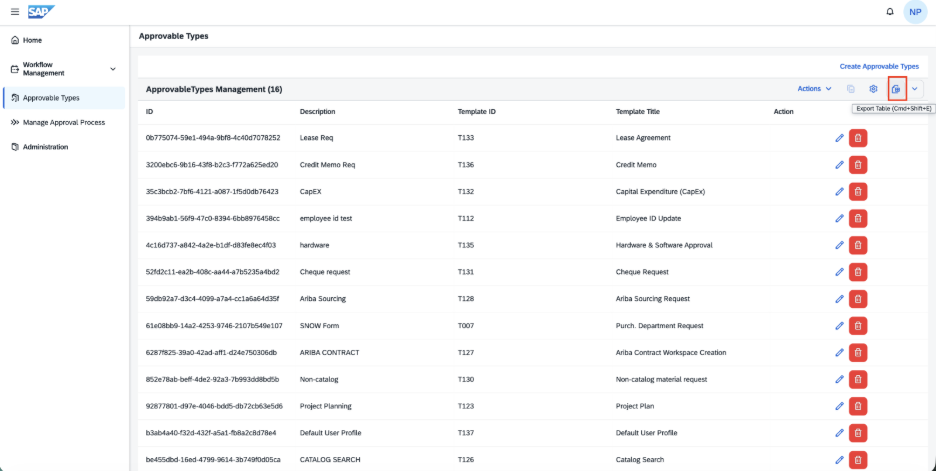
Fig 41 · Download sample Excel for bulk upload - Click Upload Approvable Types, select your completed file, and upload.
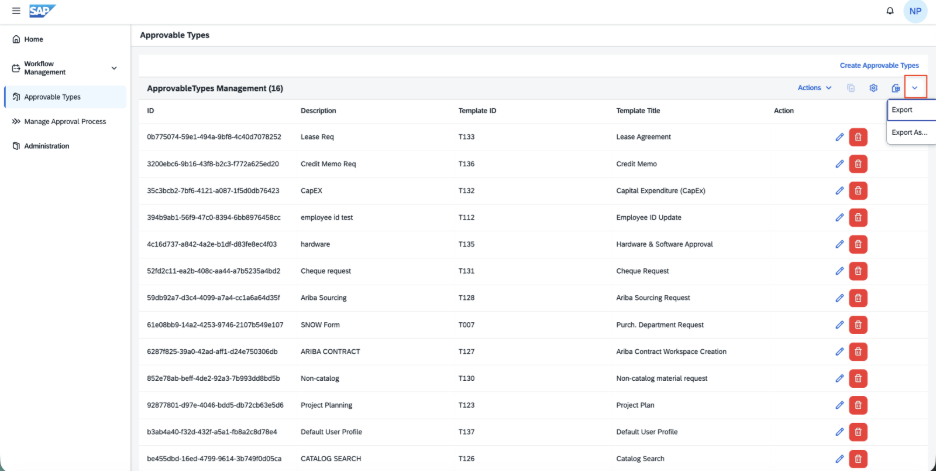
Fig 42 · Upload Approvable Types
Manage Approval Process
Creating a New Approval Process
- Click Manage Approval Process in Workflow Management.
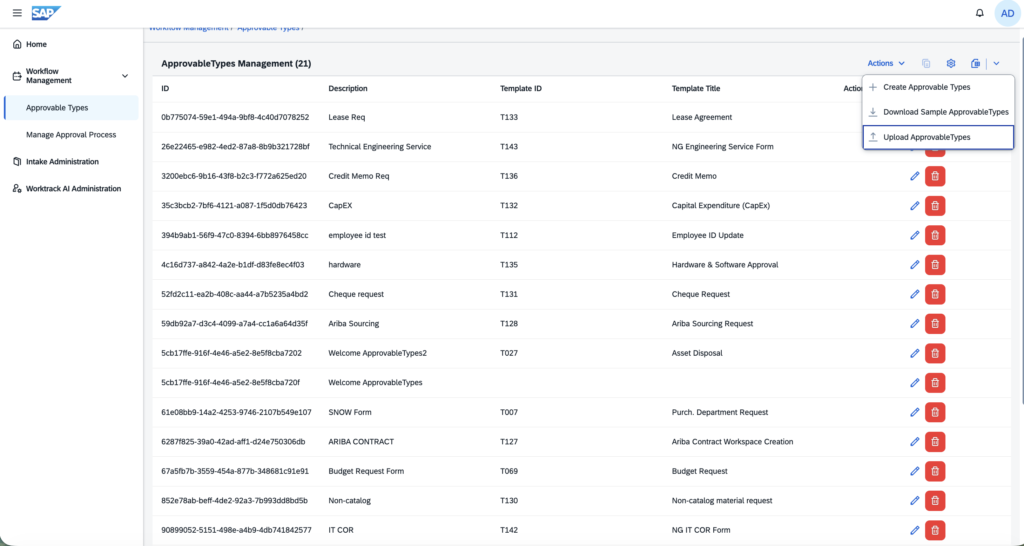
Fig 43 · Manage Approval Process — main view - Click Create new version.
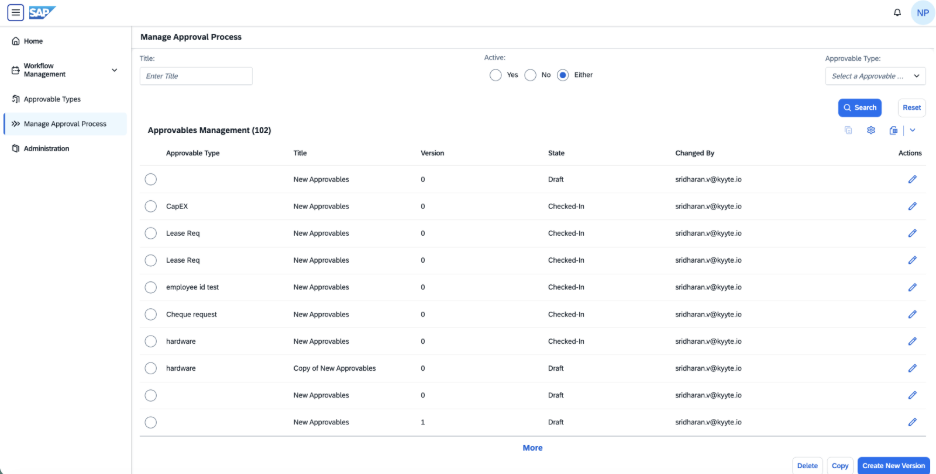
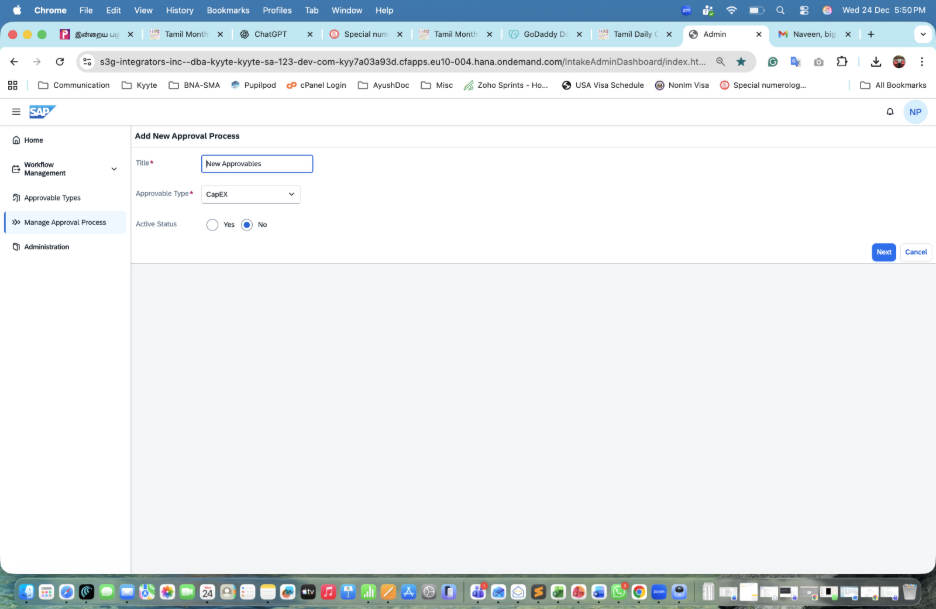
Fig 44 · Create new version button - Enter Title, Type, and Active Status, then click Next.
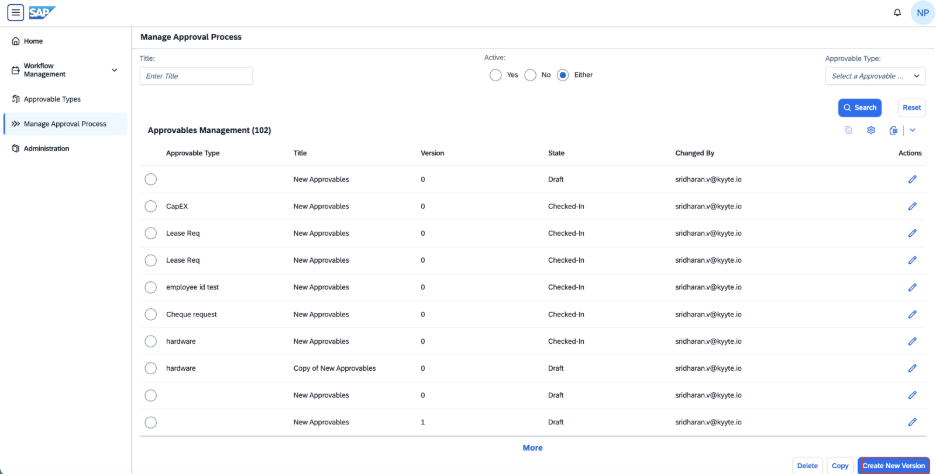
Fig 45 · Enter process title, type, and active status - Click User or Group to assign approvers. Edit the Rule Title and Rule Description as needed.
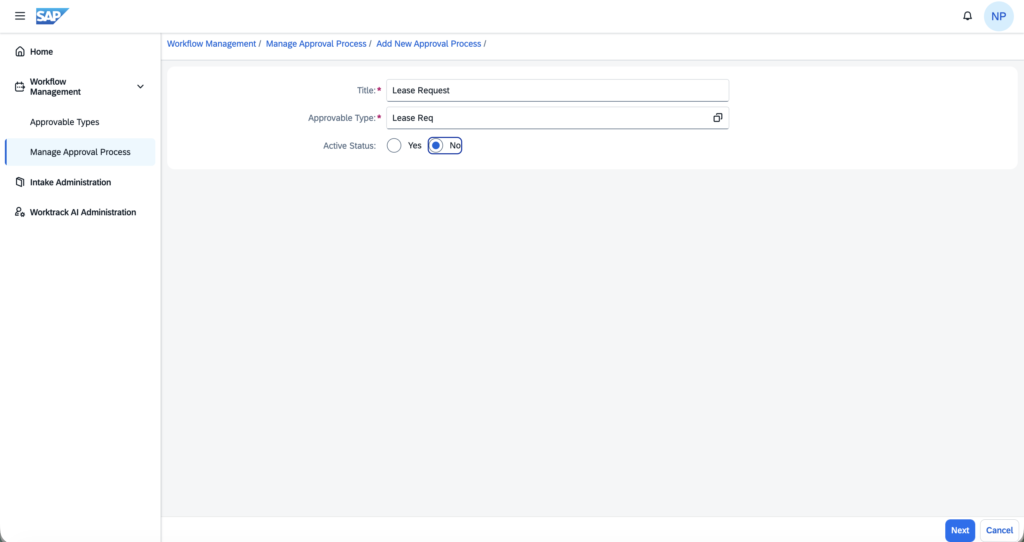
Fig 46 · Select approver user or group 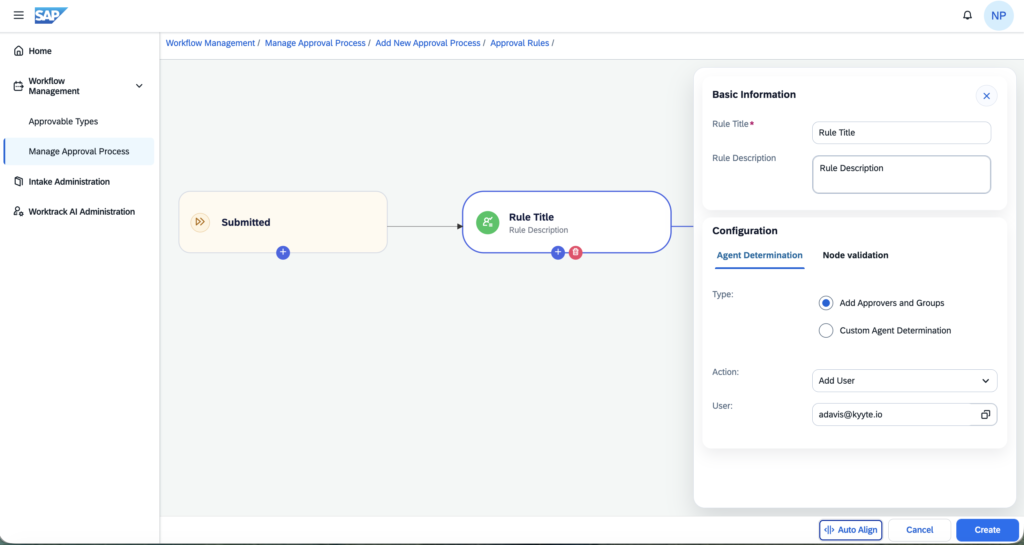
Fig 47 · Configure rule title and description - Click the (+) symbol to add serial approval nodes for multi-step flows.
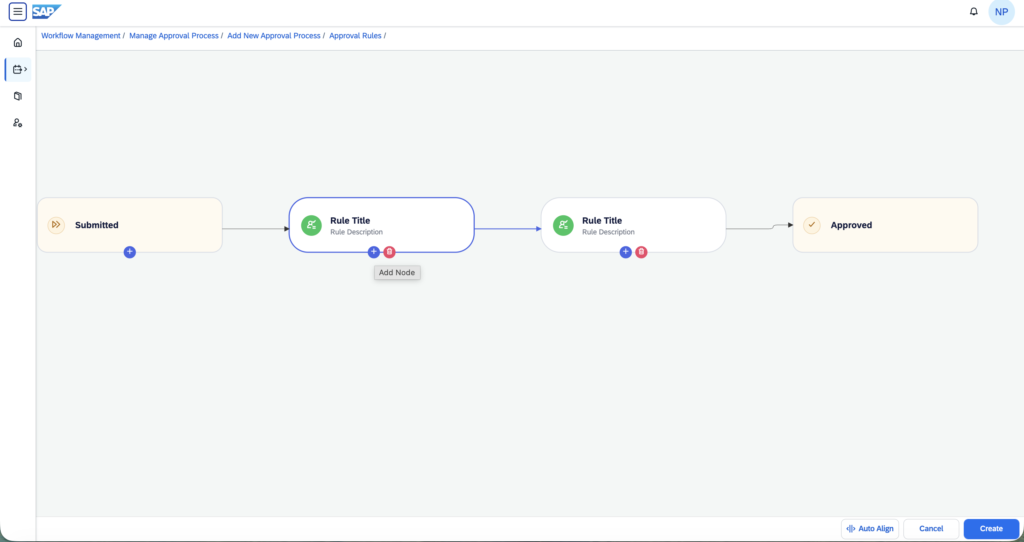
Fig 48 · Add a serial approval node - Click Delete symbol to remove a node if needed, then click Create to finalize.
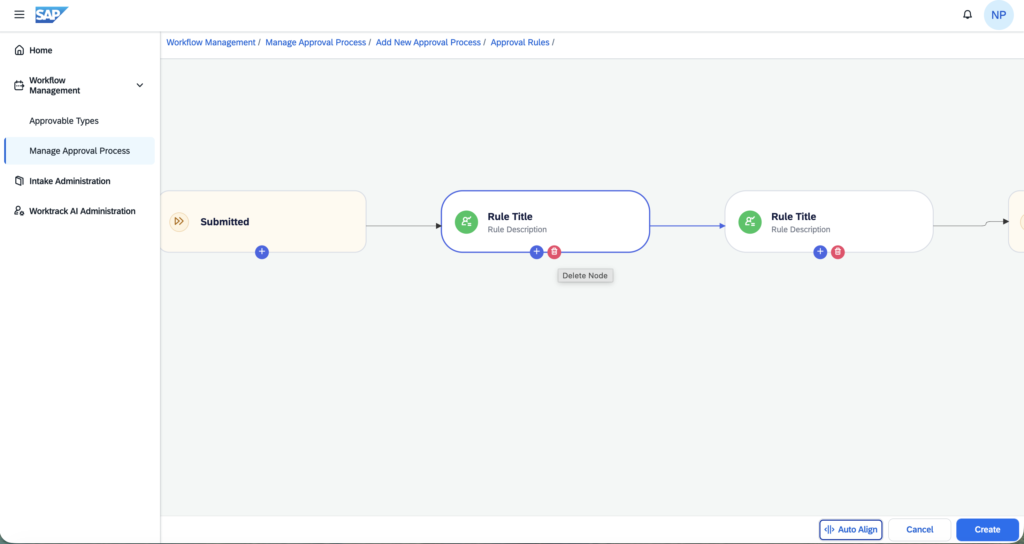
Fig 49 · Finalize and create the approval process
Editing an Approval Process
- Click the Edit icon on the approval process row.
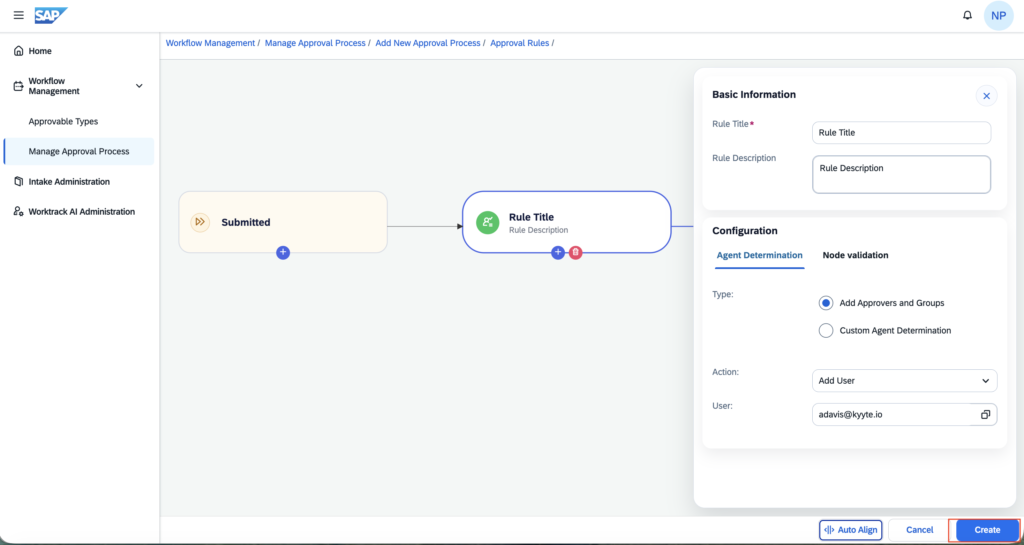
Fig 50 · Edit icon for an approval process - Make changes, click Next, then Save.
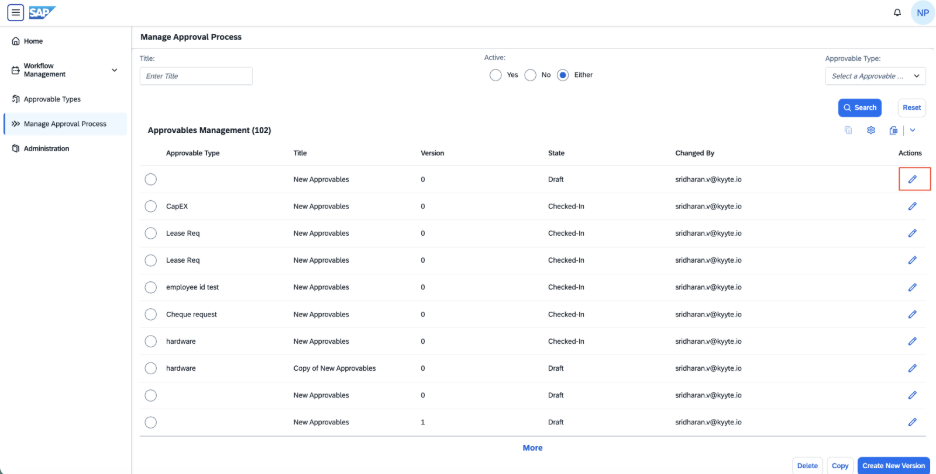
Fig 51 · Save updated approval process
Additional Operations
| Operation | How To |
|---|---|
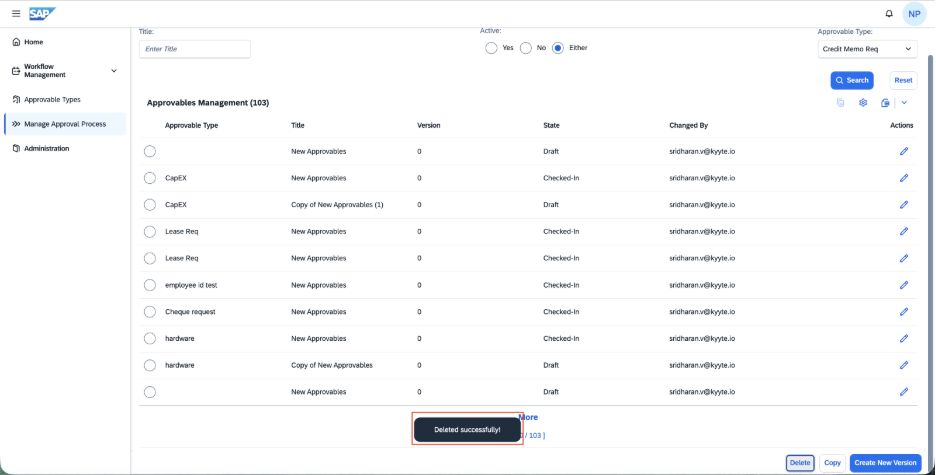
| Delete | Select process → click Delete button |
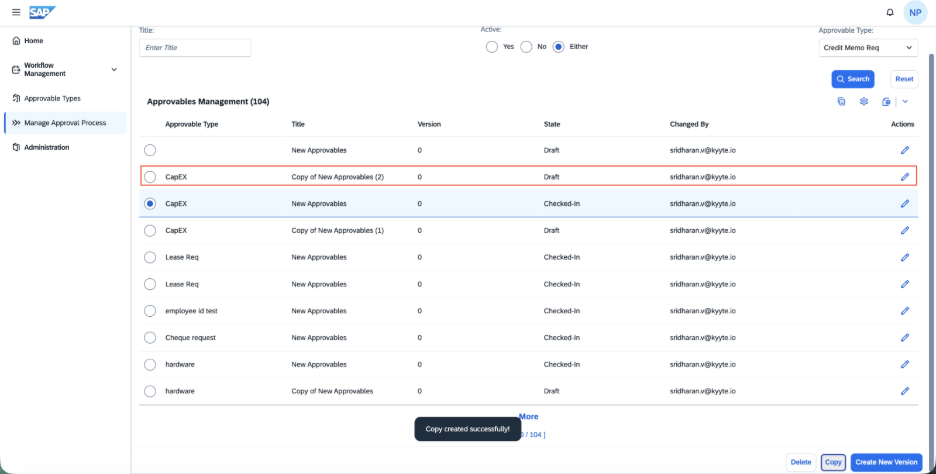
| Copy | Select process → click Copy — creates a duplicate with "Copy of" prefix |
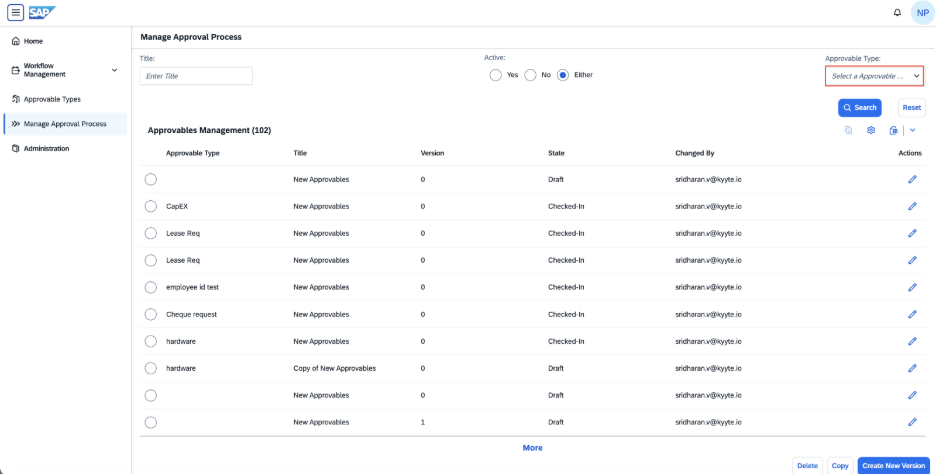
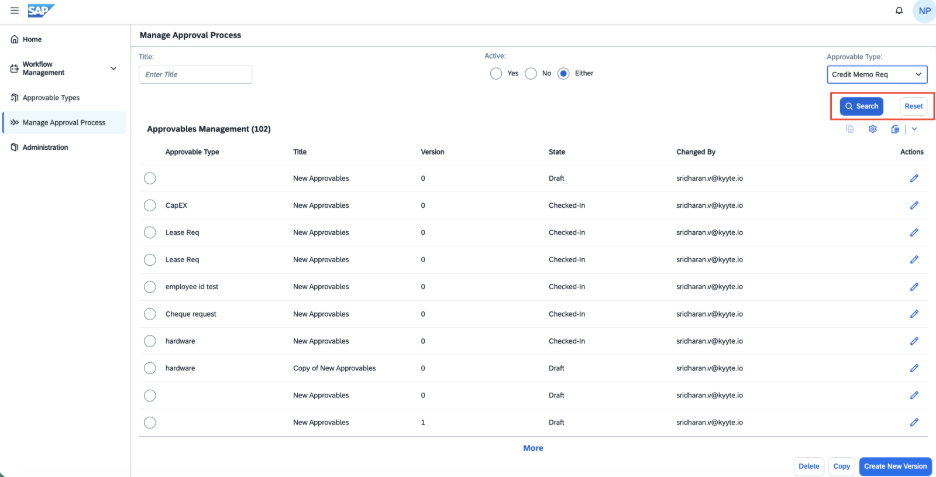
| Search / Filter | Use filter dropdowns → click Search; Reset to clear |
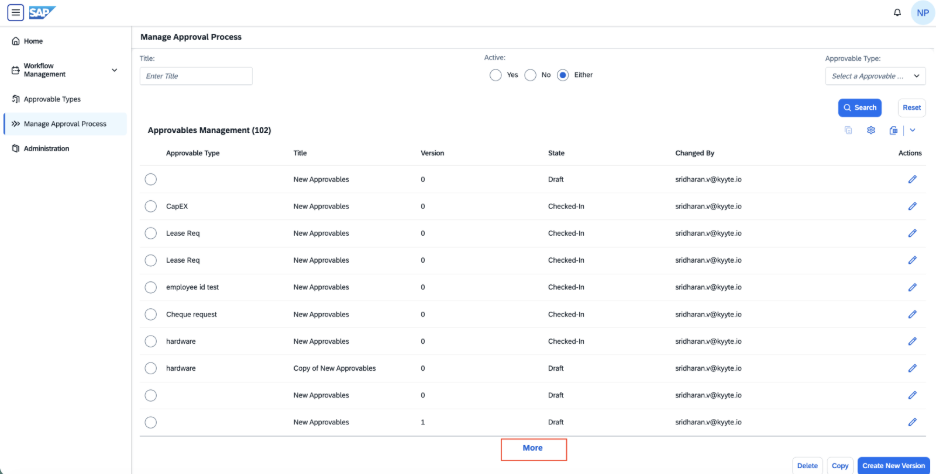
| Load More | Click More at the bottom to load additional records |
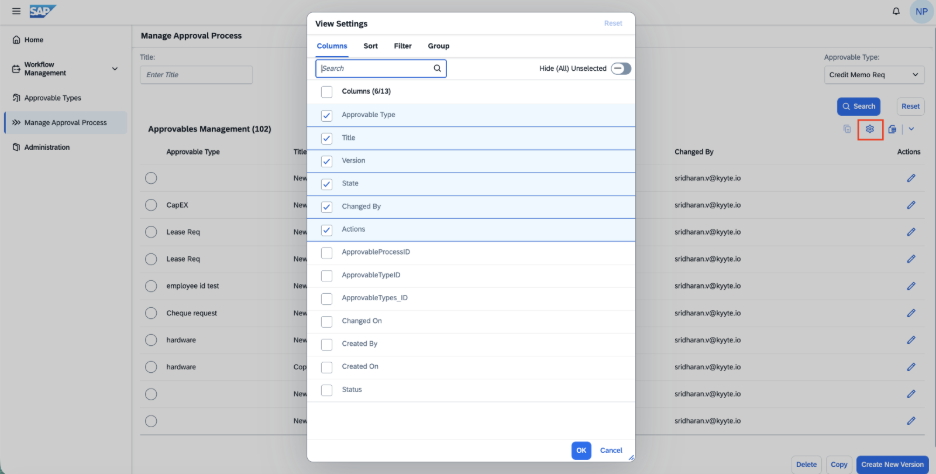
| Change View | Settings icon → adjust column and display preferences |
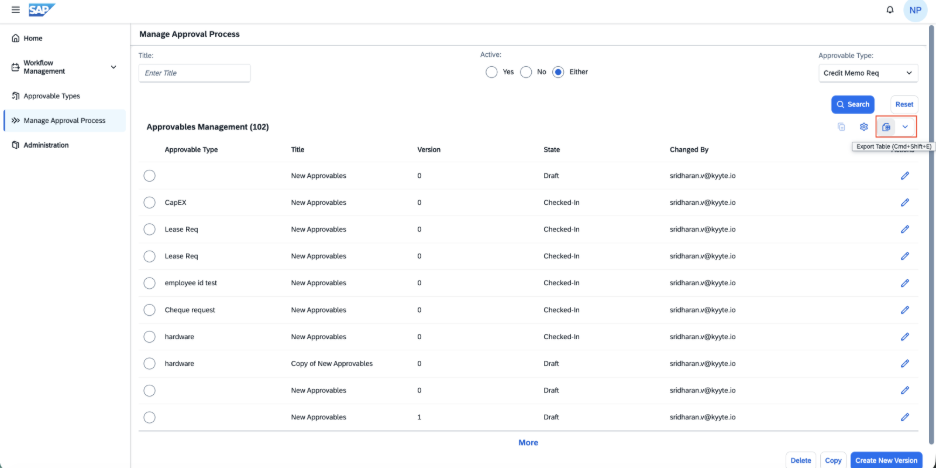
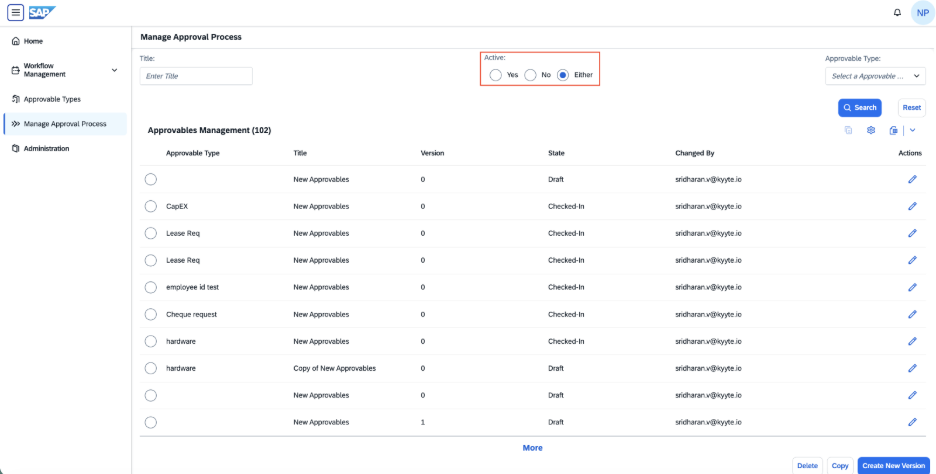
| Export | Export icon → select format to export all records |